Hacking a cloud pet feeder for full local use
📅 Published on
Some time ago I went on a trip, and against better judgement bought a smart pet feeder to take care of two adorable cats in my absence. All I want out of a device like this is some kind of local API to script against and a camera endpoint I can integrate into my network. But that product doesn't exist.
Instead, so-called smart appliances almost without exception require an app from the Apple or Google store for initial configuration and subsequent control of the device. Requiring customers to forward ports is problematic on many different levels, so instead a cloud platform sits in between to relay traffic between your smartphone and the target appliance. And since this cloud is already processing your data - how would you like a monthly subscription so we can store it longer or analyse it further..?

This state of affairs is unfortunate, but I was hopeful a way around normal operating mode could be found. So I simply went with a feeder that looked sturdy and whose manufacturer had been around for some time: the Pettadore Nutri View and got to work.
Previous work
Our particular device is powered by Tuya; a leading Chinese IoT cloud company in the smart home market. Tuya's platform lets makers buy pre-made hardware & software bundles for specified smart home goals. Simply add a plastic shell and some graphics to individualize the included app and you're on your way to a product. To their credit, Tuya is pretty decent with opening up specifications (which is what developers crave) which has helped spawn third party initiatives:
Libraries such as TinyTuya (python) or Tuyapi (node.js) provide a way to communicate with Tuya devices outside of the official apps. Using these libraries allow you to disconnect your feeder from the internet and control it directly over LAN instead. You are however required to create a Tuya developer account and register your device to obtain a decryption key to communicate with it.
An alternative approach is taken by projects like ESPHome and Tasmota which flash the Tuya MCU (Micro Controller Unit) with alternative open-source firmware. This gives maximum freedom over your hardware, but unfortunately only a subset of the chips used by Tuya are supported.
Initial probing
In its unconfigured state, the feeder will boot with its wireless module set to AP mode, advertising an open network with SSID SmartLife_{random-id}. We connect to it and use nmap to discover open ports:
vandermeij-tech ~ # nmap --open -sS -sU 192.168.10.1

Starting Nmap 7.95 ( https://nmap.org ) at 2025-08-04 11:02 CEST
Nmap scan report for feeder (192.168.10.1)
Host is up (0.0039s latency).
Not shown: 1 closed udp port (port-unreach)
PORT      STATE         SERVICE
23/tcp    open          telnet
554/tcp   open          rtsp
6668/tcp  open          irc
51238/tcp open          unknown
67/udp    open|filtered dhcps
6669/udp  open|filtered ircu
8600/udp  open|filtered asterix
MAC Address: [REDACTED] (Shenzhen Bilian Electronic,LTD)
The scan output reveals familiar Tuya ports like tcp/6668, udp/6669 and tcp/51238 but our attention is drawn to a more interesting set of services:
RTSP at tcp/554 is a protocol used for streaming media data over a network. This is almost certainly an endpoint for the frontside camera. A quick test reveals we'll need to trace its credentials but having this freely accessible already certainly makes things easier:
vandermeij-tech ~ $ mpv rtsp://192.168.10.1:554/stream1

[ffmpeg/demuxer] rtsp: method DESCRIBE failed: 401 Unauthorized
[lavf] avformat_open_input() failed
Failed to recognize file format.
Exiting... (Errors when loading file)
Telnet at tcp/23 however holds the big prize in the form of a management shell:
Trying 192.168.10.1...
Connected to 192.168.10.1.
Escape character is '^]'.

goke login:
Network login crackers like hydra support telnet, but at 350 tries per minute there wasn't much hope for a successful brute force entry and before long we decide to get our screwdrivers out instead.
Hardware analysis
Opening up the device reveals three separate circuit boards:
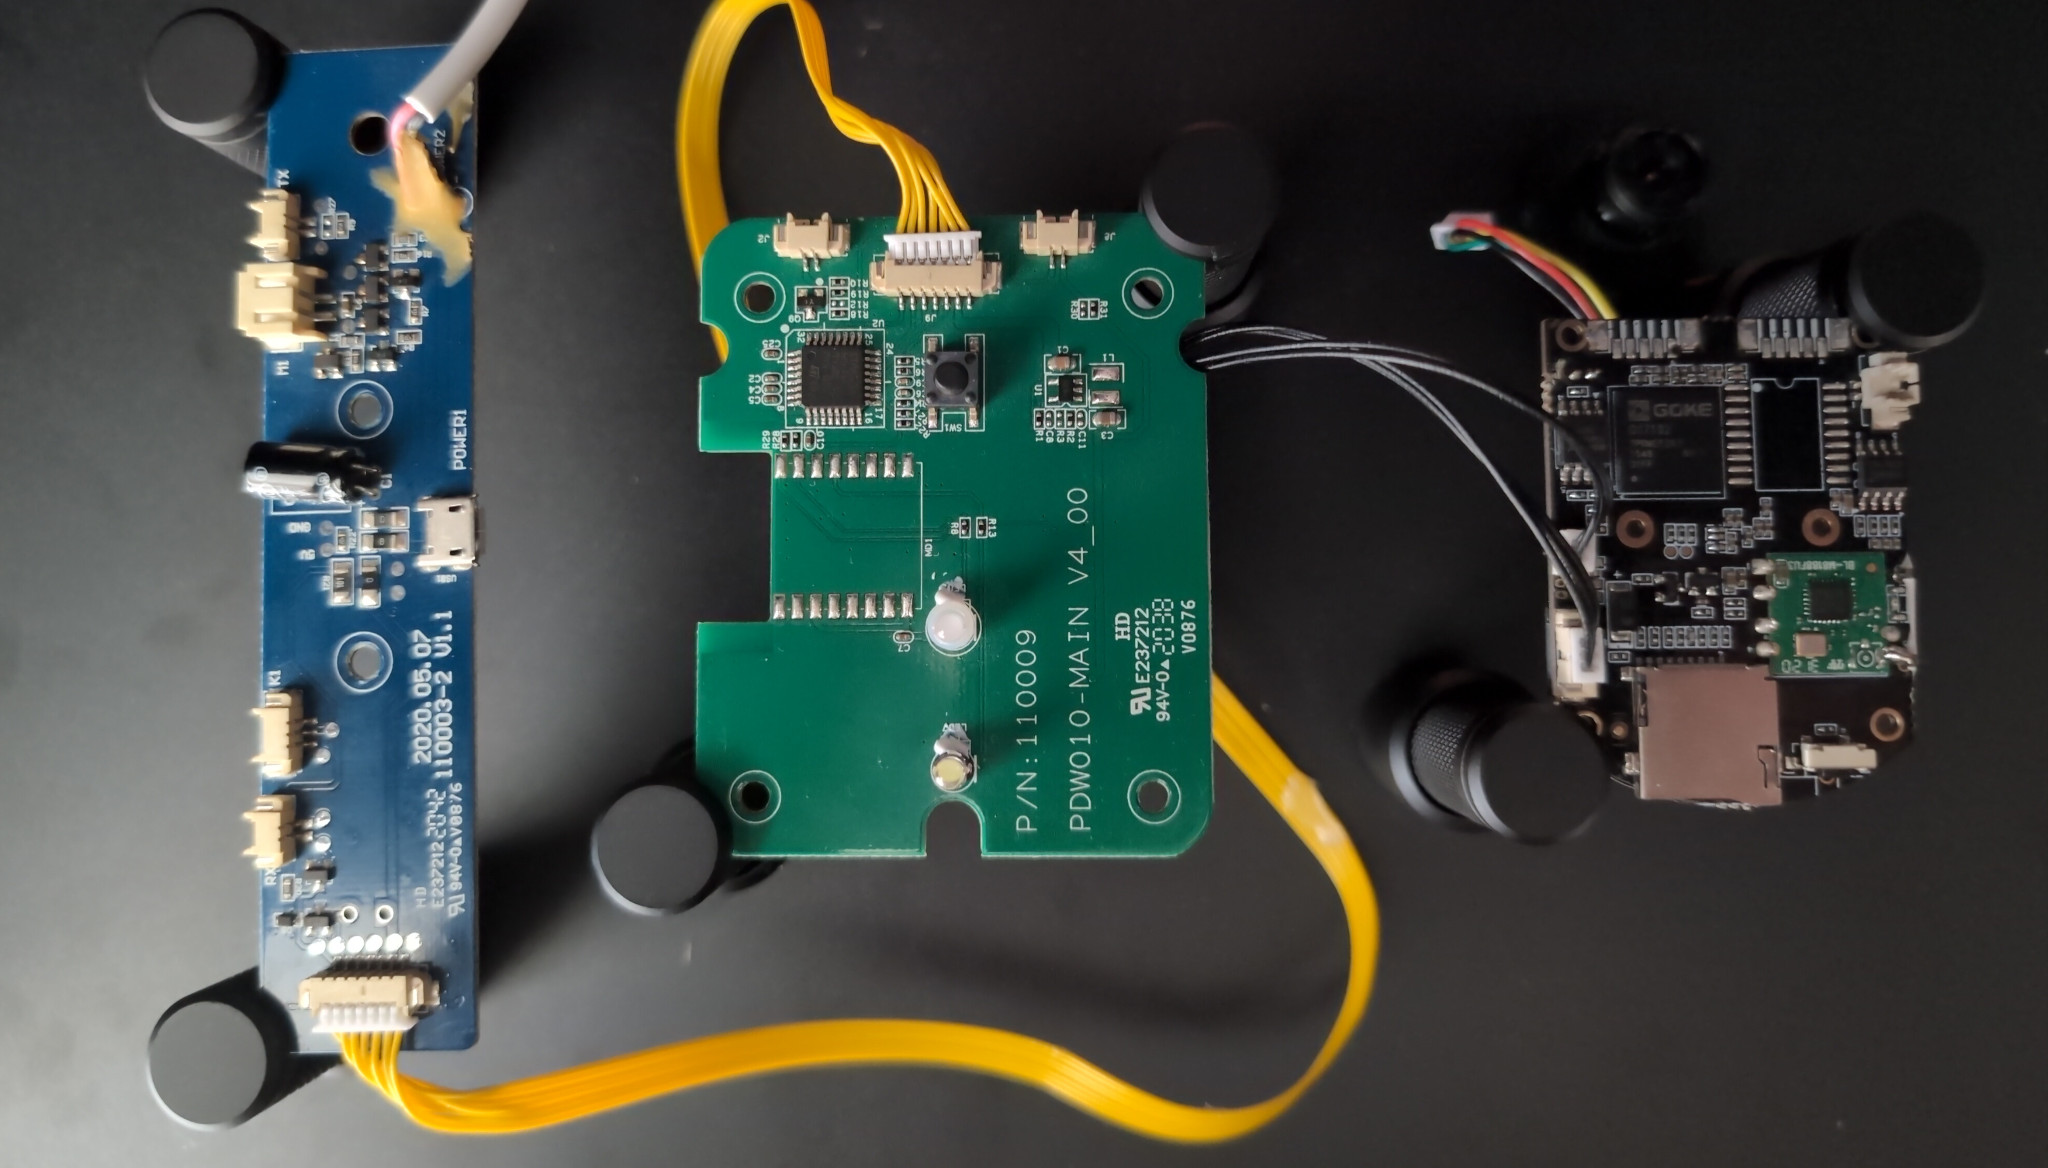
On the left is a board that supplies power via usb-a and has headers for the feeding motor and sensors related to the hopper like IR to detect low-feed status and an open/closed detector for its lid.
In the middle is a controller board featuring some LEDs, a physical button to drive the motor and the Tuya MCU by way of a STM8 chip. The backside of this PCB also includes (SWIM) pads to program the chip, but this is beyond the scope of this article.
The board on the right is a SoC (System on a Chip) using a Goke GK7102 by Goke Microelectronics. Soldered on to the board is a Realtek RTL8188FTV wireless module.
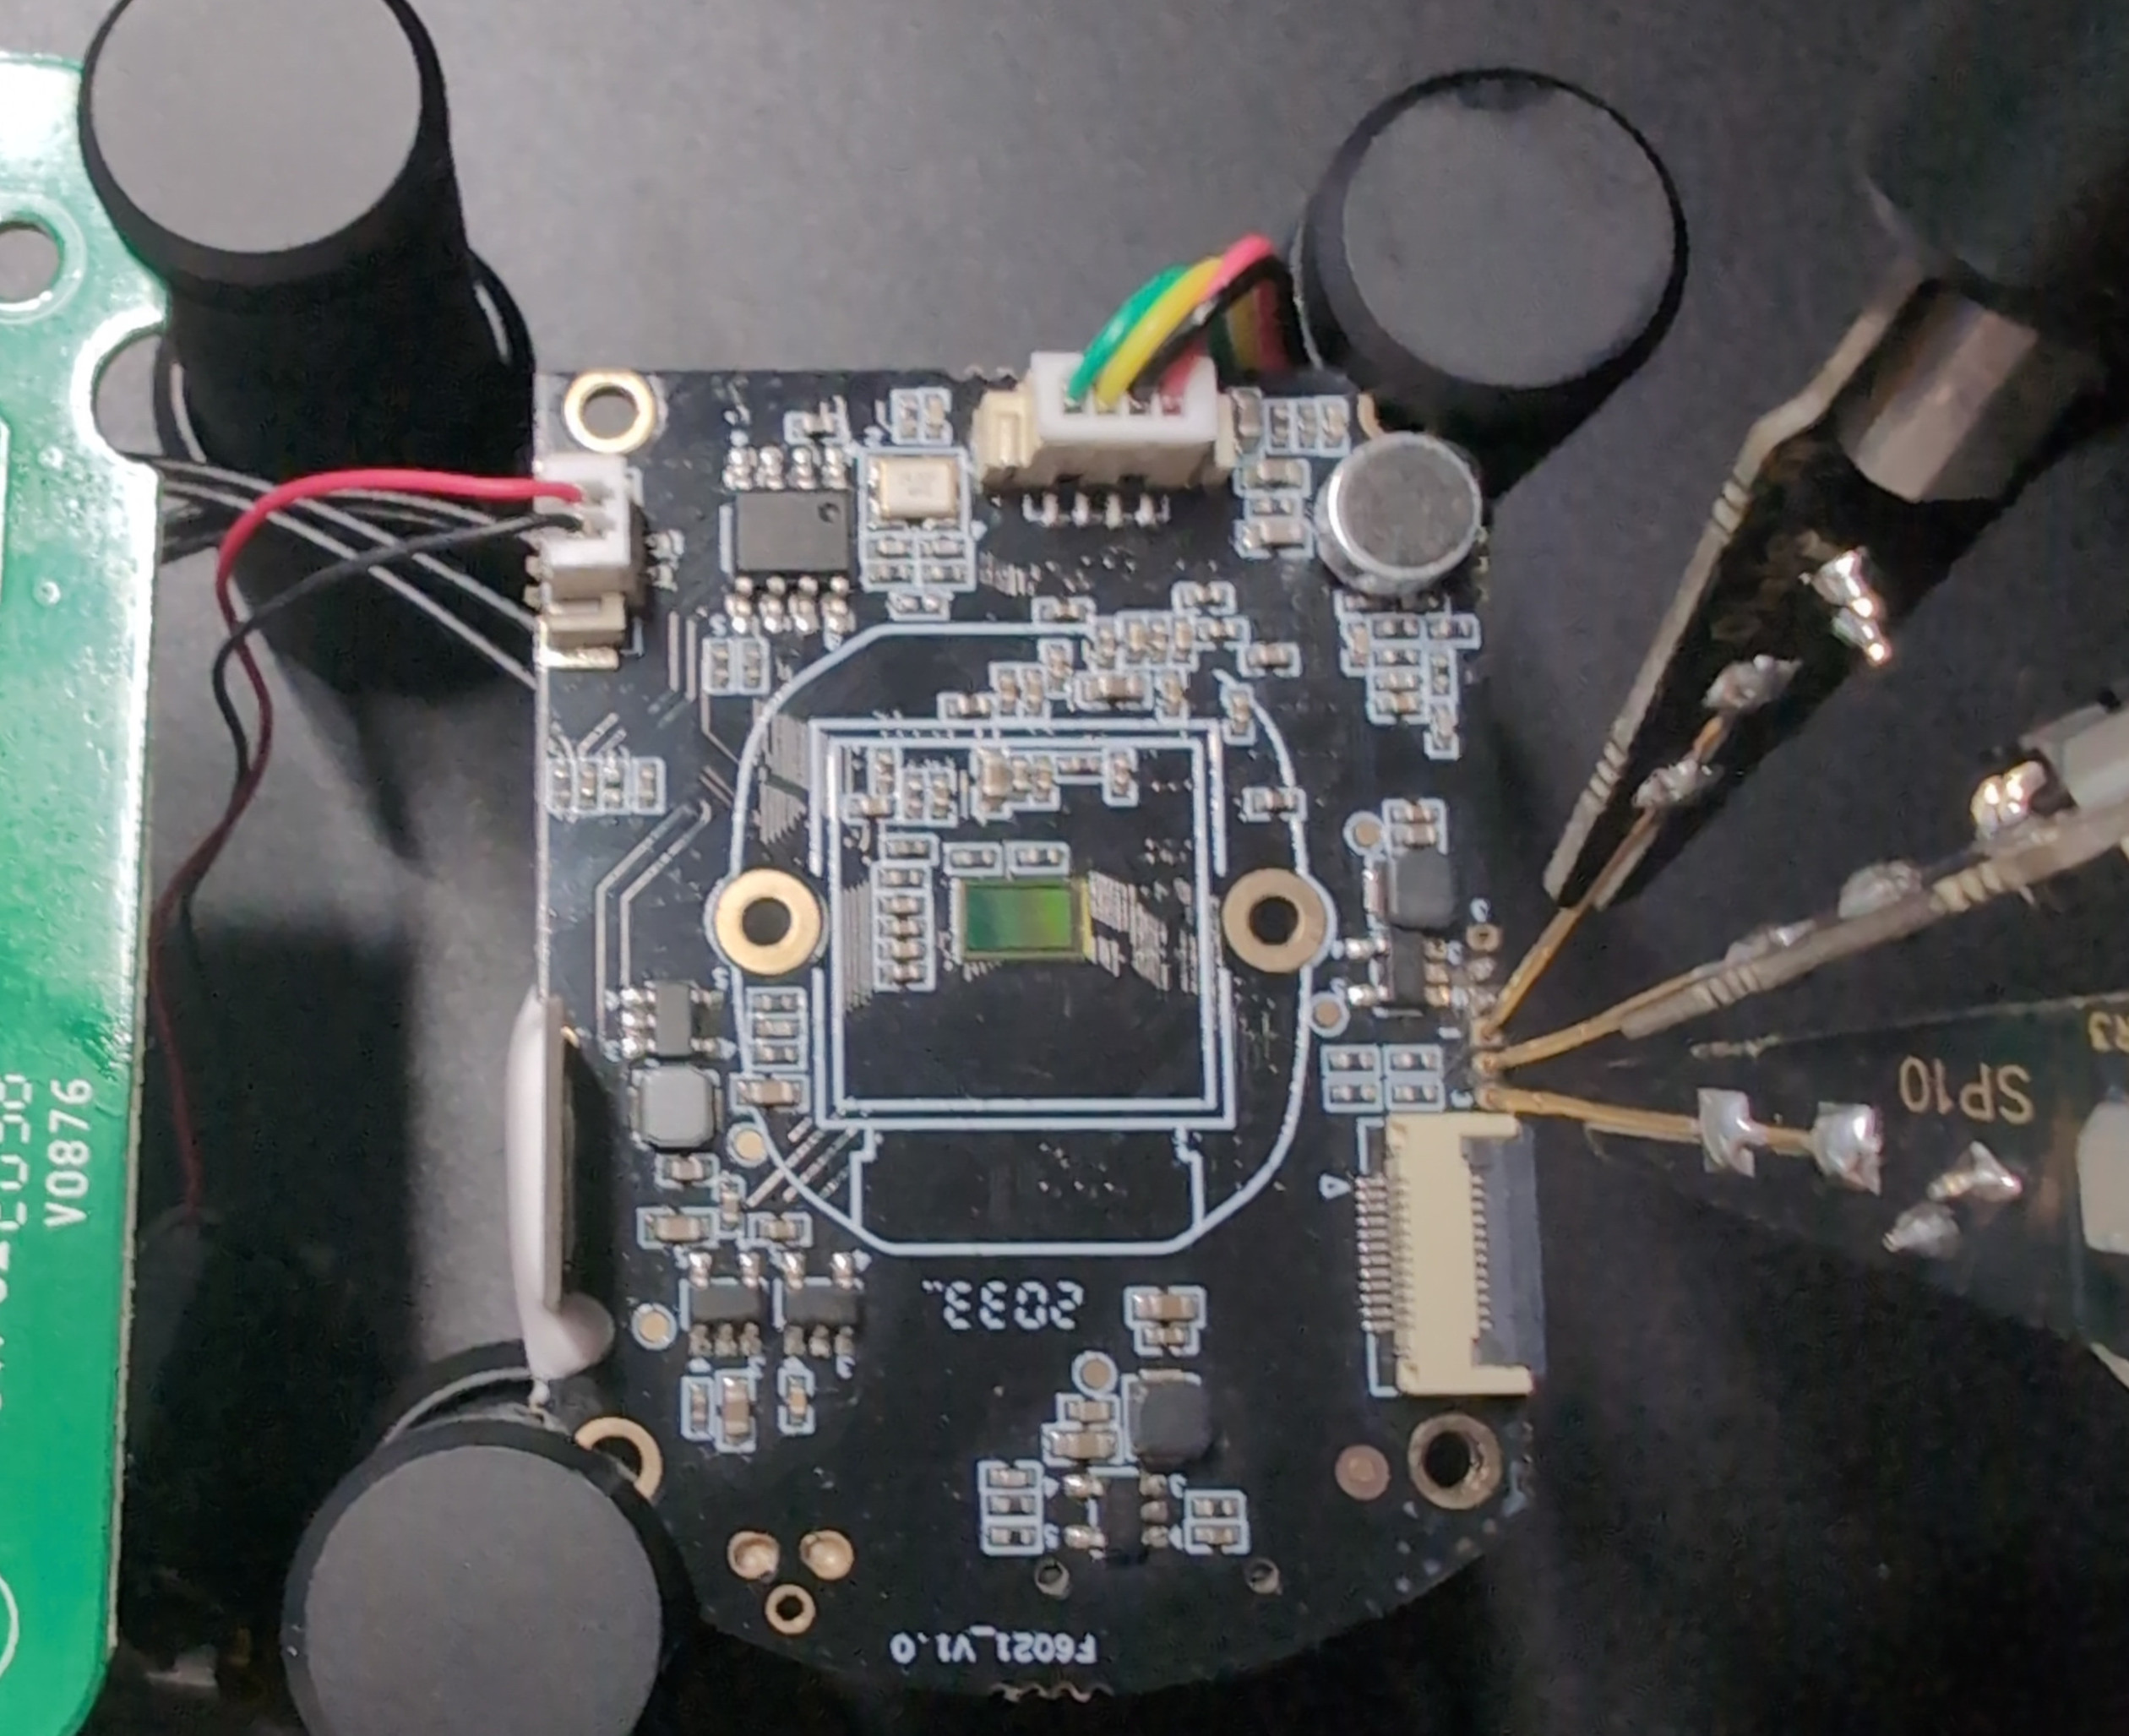
The backside of the SoC reveals a set of 1+3 pin holes that we identify as a UART debugging port. Attaching probes as shown above using RX/TX/GND (top to bottom) provides access to the system at baud 115200.
Entering the bootloader
A full system-boot.txt scrolls by, settling at presumably the same login prompt that we saw earlier through telnet. Only now we have a new weapon in our arsenal. By interrupting the bootloader from autobooting, we can enter its console and manipulate the kernel boot parameters.
Yet this board throws up another barrier - all commands seem to be locked until a password is given:
U-Boot 2012.10 (Jan 11 2019 - 21:23:59) for GK7102 rb-aijia-v2.0 (GOKE)

HAL:   20160913
DRAM:  64 MiB
Flash: [W25Q64FV] USE 4X mode read and 4X mode write
8 MiB
SF:    8 MiB [page:256 Bytes] [sector:64 KiB] [count:128] (W25Q64FV)
*** Warning - bad CRC, using default environment

In:    serial
Out:   serial
Err:   serial
Net:   Int PHY
Hit Enter key to stop autoboot:  0
GK7102 # setenv
Password invalid, Please try again! :(
GK7102 # help
Password invalid, Please try again! :(
GK7102 #
Password encoding was not introduced in U-boot until their 2015 releases, so it's a fair assumption that the password will be written into the firmware as plain text. We don't even make an attempt at brute forcing here and instead turn to the hardware again.
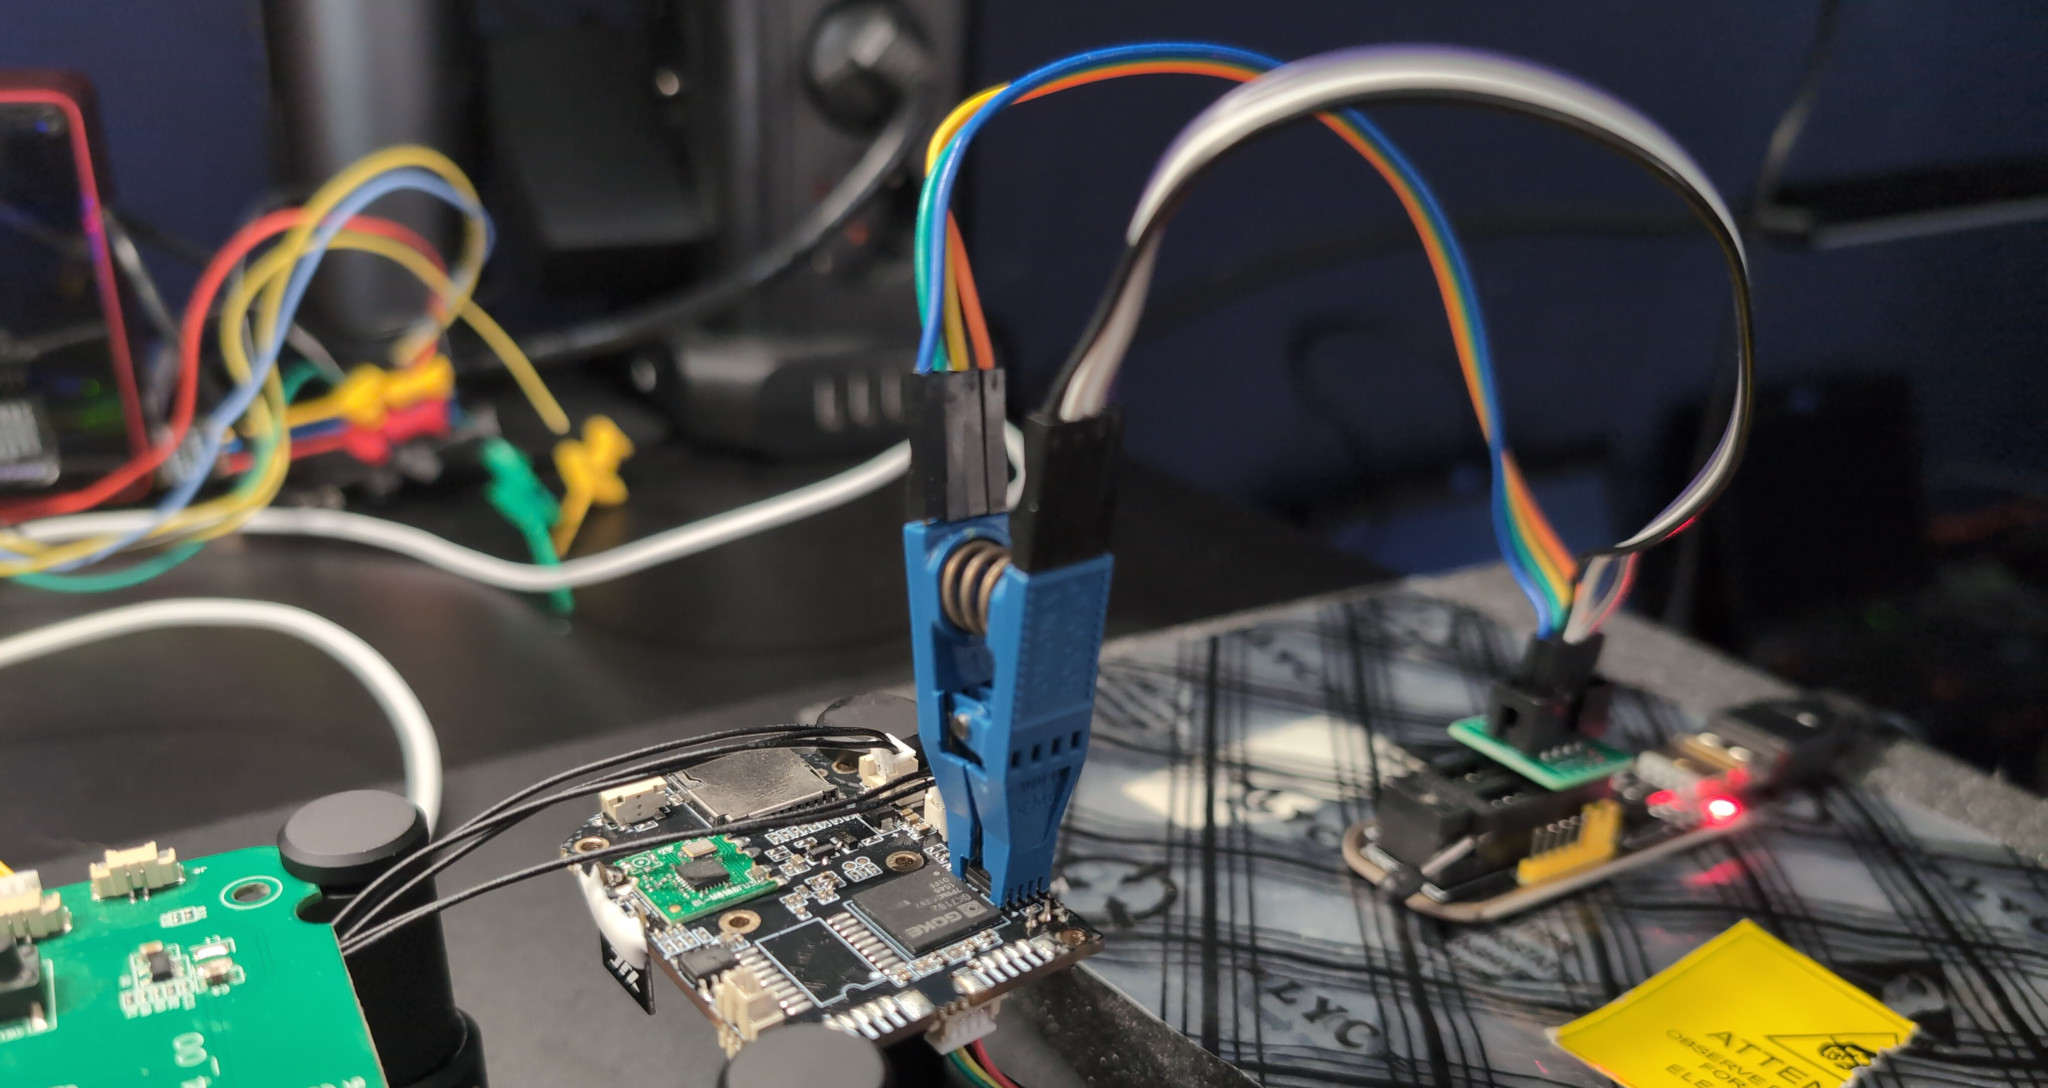
Dumping the firmware
Right next to the CPU sits a Winbond W25Q64 memory chip that we can attach our SPI programmer on - after which we dump.txt the firmware using flashrom.
Our output is a 8 Megabyte ROM image that at first didn't seem to offer any workable content. Did the readout get corrupted? Is the data encrypted? Even binwalk couldn't make much sense of it but claimed to find a big endian CRC table. At this point the concept of Endianness resurfaced, and after reversing the byte order..
objcopy -I binary -O binary --reverse-bytes=4 gk7102.rom
.. the analysis became what we expected:
vandermeij-tech ~ $ binwalk -t gk7102.rom

DECIMAL       HEXADECIMAL     DESCRIPTION
------------------------------------------------------------------------------------------------
115504        0x1C330         CRC32 polynomial table, little endian
262144        0x40000         Linux kernel ARM boot executable zImage (little-endian)
277531        0x43C1B         xz compressed data
277752        0x43CF8         xz compressed data
2359296       0x240000        Squashfs filesystem, little endian, version 4.0, compression:xz,
                              size: 902384 bytes, 361 inodes, blocksize: 65536 bytes, created:
                              2019-12-02 12:59:59
3276800       0x320000        JFFS2 filesystem, little endian
7405744       0x7100B0        JFFS2 filesystem, little endian
7471104       0x720000        JFFS2 filesystem, little endian
7767104       0x768440        JFFS2 filesystem, little endian
7798972       0x7700BC        JFFS2 filesystem, little endian
7861064       0x77F348        ESP Image (ESP32): segment count: 6, flash mode: QUIO, flash
                              speed: 40MHz, flash size: 1MB, entry address: 0x1, hash: none
7861192       0x77F3C8        ESP Image (ESP32): segment count: 6, flash mode: QUIO, flash
                              speed: 40MHz, flash size: 1MB, entry address: 0x2, hash: none
7864056       0x77FEF8        Zlib compressed data, compressed
7864320       0x780000        JFFS2 filesystem, little endian
7930040       0x7900B8        JFFS2 filesystem, little endian
7996832       0x7A05A0        JFFS2 filesystem, little endian
8026836       0x7A7AD4        JFFS2 filesystem, little endian
8061112       0x7B00B8        JFFS2 filesystem, little endian
8126464       0x7C0000        JFFS2 filesystem, little endian
8257720       0x7E00B8        JFFS2 filesystem, little endian
8322928       0x7EFF70        Zlib compressed data, compressed
8323072       0x7F0000        JFFS2 filesystem, little endian
Before the kernel starting at region 0x40000 exists a space of 262144 bytes which should be the bootloader. Using classic unix tools we extract it and take a closer look at its content:
dd if=gk7102-reversed.bin of=gk7102-bootloader.bin bs=1 skip=0 count=262144
strings gk7102-bootloader-bin
As suspected, the password is right there next to the Password invalid, Please try again! :( string. :-)
Accessing the system
Armed with the bootloader password, we re-enter its console. By changing the init parameter within the bootargs value, we can have the kernel boot with a different PID 1 process, effectively skipping the login prompt that stopped us before:
GK7102 # sepcam1688
Welcome to sepcam uboot :)
GK7102 #
GK7102 # setenv bootargs console=ttySGK0,115200 mem=39M root=/dev/mtdblock2 rootfstype=squashfs init=/bin/sh phytype=0 mtdparts=gk_flash:256k(uboot),2048k(kernel),896k(rootfs),4992k(data)
GK7102 # boot
The kernel boots and lands us in a bare shell. Not much to do or see here right now. It appears most files including /etc/passwd are symlinked from another mount point, so we examine the /sbin/init_s program we replaced in the previous step and manually run some of its commands so the root account info appears:
~ # ls -lh /etc/passwd
lrwxrwxrwx    1 1010     1010          15 Dec  2  2019 /etc/passwd -> /rom/etc/passwd
~ #
~ # mount -t tmpfs none /dev
~ # mknod /dev/mtdblock3 b 31 3
~ # mount -t jffs2 /dev/mtdblock3 /rom
~ #
~ # cat /etc/passwd
root:$1$EmcmB/9a$UrsXTlmYL/6eZ9A2ST2Yl/:0:0:Administrator:/:/bin/sh
~ #
Gaining root
Each line in /etc/passwd represents user account data, with fields separated by colons. The string in the second field has three parts, delimited by $, and begins with $1, indicating it's a salted MD5 hash. We're lucky in that MD5 is reasonably feasible to crack up to a certain complexity - unlike stronger hashing methods which can exceed the lifespan of the solar system.
It appears we are double lucky here though, because the password turns out to be a variation of the bootloader password we found earlier. Even on my modest 2013 Thinkpad, hashcat made quick work of it:
vandermeij-tech ~ $ hashcat -O -m 500 -a 3 '$1$EmcmB/9a$UrsXTlmYL/6eZ9A2ST2Yl/' sepcam?d?d?d?d?d?d --increment

$1$EmcmB/9a$UrsXTlmYL/6eZ9A2ST2Yl/:sepcam0128

Session..........: hashcat
Status...........: Cracked
Hash.Mode........: 500 (md5crypt, MD5 (Unix), Cisco-IOS $1$ (MD5))
Hash.Target......: $1$EmcmB/9a$UrsXTlmYL/6eZ9A2ST2Yl/
Time.Started.....: Tue Aug  4 12:54:25 2025 (0 secs)
Time.Estimated...: Tue Aug  4 12:54:25 2025 (0 secs)
Kernel.Feature...: Optimized Kernel
Guess.Mask.......: sepcam?d?d?d?d [10]
Guess.Queue......: 10/12 (83.33%)
Speed.#1.........:    23026 H/s (10.89ms) @ Accel:128 Loops:500 Thr:1 Vec:4
Recovered........: 1/1 (100.00%) Digests (total), 1/1 (100.00%) Digests (new)
Progress.........: 6144/10000 (61.44%)
Rejected.........: 0/6144 (0.00%)
Restore.Point....: 5632/10000 (56.32%)
Restore.Sub.#1...: Salt:0 Amplifier:0-1 Iteration:500-1000
Candidate.Engine.: Device Generator
Candidates.#1....: sepcam0654 -> sepcam3328
Hardware.Mon.#1..: Temp: 80c Util: 91%

Started: Tue Aug  4 12:54:17 2025
Stopped: Tue Aug  4 12:54:26 2025
And indeed, after rebooting, we can now login without tools through telnet:
vandermeij-tech ~ $ telnet 192.168.10.1

Trying 192.168.10.1...
Connected to 192.168.10.1.
Escape character is '^]'.

goke login: root
Password:
# uname -a
Linux goke 3.4.43 #36 PREEMPT Thu Aug 29 20:27:30 CST 2019 armv6l GNU/Linux
Process analysis
The system is equipped with more safeguards that hinder friendly tampering; a filesystem that is mostly read-only, and a kernel watchdog that protects two processes so that the system reboots if either crash or are otherwise interrupted:
/usr/bin/sepcamera is the main (C++) application which is attached to various peripherals:
170     /usr/bin/sepcamera      /dev/watchdog
170     /usr/bin/sepcamera      /dev/gk_fw
170     /usr/bin/sepcamera      /dev/gk_video
170     /usr/bin/sepcamera      /proc/goke/video_sync
170     /usr/bin/sepcamera      /dev/ai_dev
170     /usr/bin/sepcamera      /dev/ao_dev
170     /usr/bin/sepcamera      /dev/ttySGK1
170     /usr/bin/sepcamera      /dev/key_gpio
170     /usr/bin/sepcamera      /dev/adc
231     /usr/bin/sepcamera      /dev/watchdog
/system/bin/daemon.sh is a script that continuously monitors the health of other application processes. It notably includes logic to terminate tuyaapp and start p2papp whenever /tmp/factory_mode.txt exists. Besides making a bunch of connections to Chinese webservers, p2papp also opens a set of ports so it might be worthwhile to disassemble it and look for a debugging interface.
Also worth mentioning are processes like guard, guide and networksapp which are awefully chatty between themselves and sepcamera via IPC sockets. Going over the function names within the binaries it seems to us there is much overlapping functionality so it's hard to ascertain who does what without a closer look.
Process tracing
The system includes only BusyBox (2016) utilities, but using hexdump -C < /dev/ttySGK1 we can see sepcamera doing the typical Tuya dance (55 aa ♬ ..) with the TuyaMCU.
It would be convenient to have more advanced debugging tools to trace interactions between sepcamera and the rest of the system. Using crosstool-ng, we build.sh a compatible strace binary for the arm-unknown-linux-uclibcgnueabi target and make it available on a TFTP server for our system to fetch:
tftp -l /tmp/strace -r strace -g {tftpd-ipv4} {tftpd-port}
We then attach strace to the running sepcamera processes using:
#!/bin/sh

chmod +x /tmp/strace

for pid in $(pidof sepcamera); do
    /tmp/strace -f -t -y -p "$pid" -e trace=write,writev -s4096 -x -o /tmp/$pid.log &
done
Our primary goal is to enable the feeding motor. Both the official app and the physical button on the device manually trigger the motor. Unfortunately it appears the button's signal goes directly to the Tuya MCU because we only receive what seems like an acknowledgement for bookkeeping purposes on ttySGK1.
We bite our tongue and install the app on a Waydroid instance so we make a full trace of all its behaviour. Now that we hopefully have everything we need we hold the physical button for 5 seconds and let the appliance reset to factory defaults.
Motor control
Our strace log shows that Tuya commands are written to the ttySGK1 device when the motor is manually triggered, in line with the specifications defined in Tuya's Serial Communication Protocol . By matching the log timestamps with our button presses, the command to trigger the motor is identified. By sending the following command to ttySGK1 we can now trigger it on our terms:
printf "\x55\xaa\x00\x06\x00\x08\xc9\x02\x00\x04\x00\x00\x00\x01\xdd" > /dev/ttySGK1
Camera access
Returning to our RTSP endpoint, we look through the sepcamera binary using a disassembler and find that functions related to rtsp include references to a memory address that holds the string admin. Could it really be this easy? It appears so - we use nmap's rtsp-url-brute script to look for URLs and find.txt them:
vandermeij-tech ~ $ ffprobe -hide_banner -rtsp_transport tcp "rtsp://admin:admin@192.168.10.1/video"

Input #0, rtsp, from 'rtsp://admin:admin@192.168.10.1/video':
  Metadata:
    title           : Session
  Duration: N/A, start: -0.005478, bitrate: N/A
  Stream #0:0: Video: h264 (Main), yuv420p(progressive), 1280x720, 15 fps, 13.75 tbr, 90k tbn
  Stream #0:1: Audio: adpcm_g726le (g726le), 8000 Hz, mono, s16, 16 kb/s
Wireless configuration
The official procedure to pair the device with your home network involves entering your wifi credentials into the app, which encodes them into a QR code. When shown to the camera, the sepcamera process, upon recognition, initiates a sequence of actions to re-configure the device's network configuration.
Snooping on sepcamera reveals we can trigger network re-configuration by creating a file instead:
printf '{"p":"my-wifi-password","s":"my-wifi-ssid","t":"tuya-device-token"}' > /tmp/QrMsg
We now have choice in front of us, neither of which is admittedly ideal. Connect the feeder to:
-
network with internet access: the device will exchange data with the Tuya cloud for some kind of registration and create
tuya_user.db. This encrypted database holds a master copy of your wifi credentials. Whenever the device is rebooted it will restore the credentials that were written into the database. I have not looked into manipulating the database as of yet, but if any reader knows of progress here please let me know. -
network without internet access: we can be at ease knowing our data never leaves our network, but if the device ever loses power we'll have to perform wireless configuration again. Some unexpected reboots and more decompilation revealed that sepcamera runs a weekly check for internet connectivity but this is easily circumvented with some datetime manipulation.
If you’ve read this far, you’ve probably guessed we went with a power bank and option number two.
Putting it all together
Having gained a solid understanding of the device’s internal workings, we are ready to take control of it. Using python and shell we develop a soft-mod installer for the device to:
- trigger wireless (re-)configuration
- neuter cloud-related processes where possible
- modify the routing table to only allow local traffic
- install mini_httpd to finally get that local API
Code is available on my github repo at alexandervdm/nutri-pwn.
Conclusion and future work
All we wanted was a simple device that respects our privacy - and now we have it.
As is often the case, it came at the cost of time and convenience. Certainly improvements can be made like adding a small service to monitor ttySGK1 for signals like "low food availibility", or adding a scheduler to the webpage but right now we are content with triggering the feed function through an external cronjob.
Ultimately, wiping the SoC to flash something like OpenIPC would be ideal, but there is no support for the GK7102 chip as of yet, and given the chip's age it's unlikely anyone will put in the work at this point.