Revisiting open-source firmware on the e3c246d4i
📅 Published on
Some four years ago I realized my aging cluster of Opteron servers needed to go. Their lack of NVMe support or instructions like AES-NI meant that experiments tended to become overnight runs and instead I found myself scheduling more and more jobs off-site. It was time to find a successor.
Whilst exploring options, I came across an article by Arthur Heymans where he described the process of porting Coreboot (BIOS) to a mini-itx Intel Coffeelake board; the ASRock e3c246d4i. This relatively inexpensive server board includes an Aspeed AST2500 Baseband Management Controller (BMC) that was already made OpenBMC compatible through efforts by Zev Weiss. While the e3c246d4i has many merits, this work persuaded me to pick it for my next compute configuration.
The year was 2021 however, and rising energy prices here in The Netherlands pushed me to deploy the servers into production right away. Now, years later I am finally freeing my boards.
Current state
The OpenBMC port was included into upstream in 2021 and is still maintained by its original author. The code has seen periodic improvements but noticeably still lacks fan control for the time being.
The Coreboot port was submitted for inclusion into upstream in 2021, but unfortunately never made it in. The port was however quite functional, and I took it upon myself to improve on the work. My fork implements the unaddressed feedback from the original change review, resyncs with the current Coreboot upstream and fixes some minor bugs.
Tested OK here:
- SeaBIOS
- AST2500 BMC: video
- VGA through iGPU
- 4x 8G memory ECC
- M.2 NVMe through socket
Sort of working:
- OCuLink: both ports support SATA or PCIe modes and can be configured individually. My fork includes a script to switch modes but better integration of this procedure is WIP.
Not working:
- Intel ME (Management Engine). Goes into recovery mode. Without 30 minute timer or other nastiness so not the worst thing, but ideally we want it working correctly before breaking it again.
Preparing build environments
Setting up our toolchains and compiling OpenBMC in particular can be a lengthy multi-hour affair, so best to get this started right away before we have our mainboard hooked up and ready to go.
For OpenBMC, install the prerequisites and continue by compiling the source for our target:
git clone https://github.com/openbmc/openbmc
cd openbmc

. setup e3c246d4i
bitbake obmc-phosphor-image
For Coreboot, also install its dependencies and prepare the toolchain and an utility that we'll need later on:
git clone https://github.com/alexandervdm/coreboot.git
cd coreboot

make crossgcc-i386 CPUS=$(nproc)

cd util/ifdtool && make
Connecting to the BMC
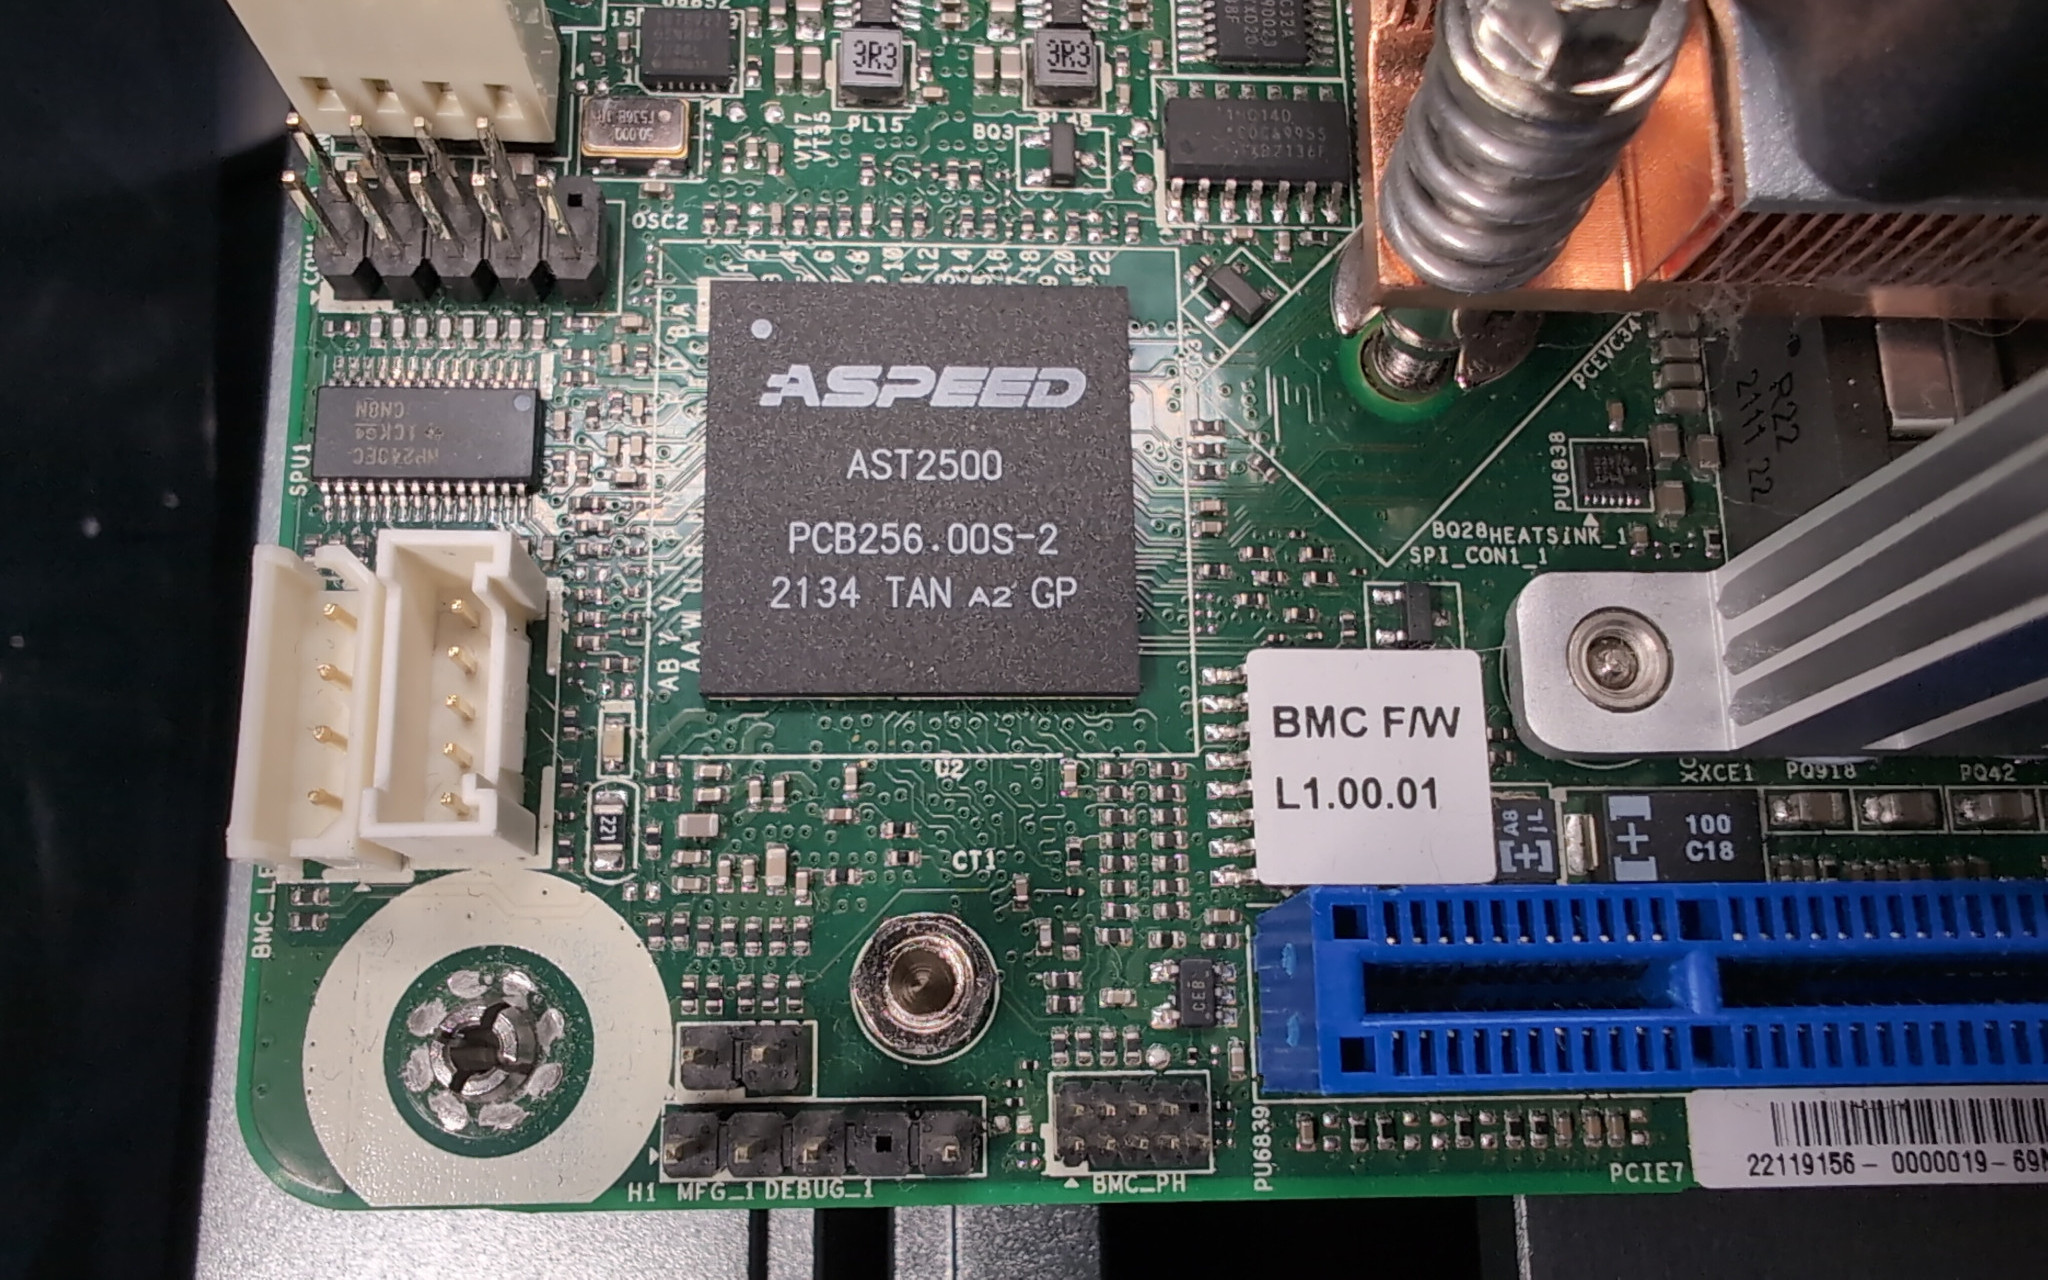
We turn our attention to the bottom-left section of the mainboard. In the middle we can see the Aspeed AST2500 BMC processor with a Winbond W25Q256JV flash memory chip next to it - here covered by a white (BMC F/W) sticker. Rather than having to carefully clamp the chip directly, this board offers us three relevant headers at the bottom edge labelled MFG_1, DEBUG_1 and BMC_PH.
MFG_1 is used by the original BMC firmware to trigger a special management mode. When the two pins of the headers are connected, booting the BMC will take you straight to a shell rather than a login prompt. Since we plan to flash the BMC anyway, we ignore this header here.
DEBUG_1 provides UART communication with the BMC. While it is not strictly necessary to hook this up, it can be useful to debug the flashing process or to provide a console outside of network or ssh.
As a side-note here; an elegant method of flashing OpenBMC exists where one interrupts the bootloader to have it load a fitImage through TFTP and boot it in RAM. OpenBMC's own tooling can then be used to flash. Here unfortunately, it seems the ancient version of u-boot (2013.7) within the original firmware does not understand the image type we built earlier. I attempted to convert it to a legacy format, which then loads - but could not get past the kernel hanging. For now we venture on by flashing through SPI instead.
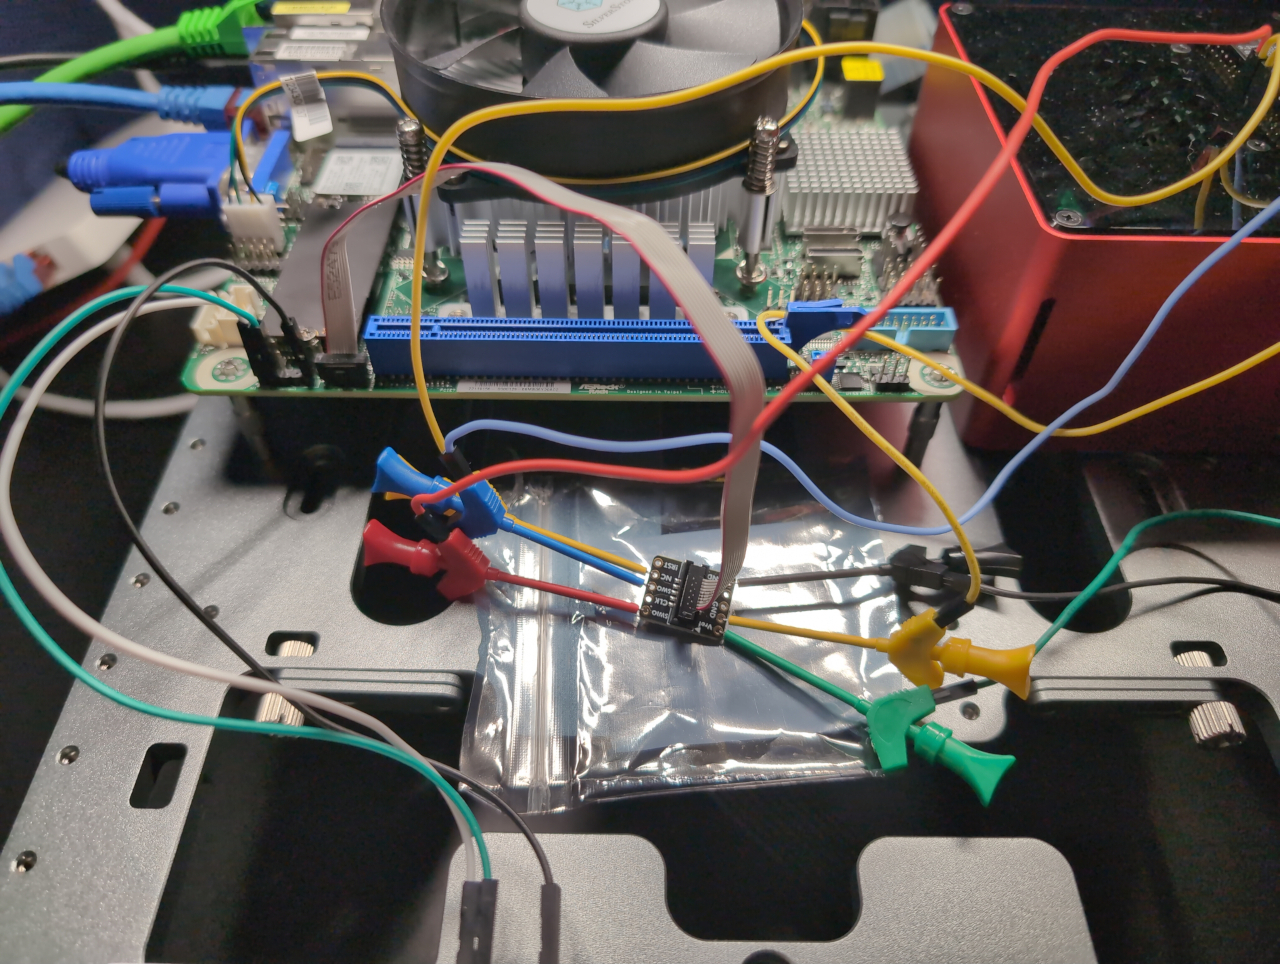
BMC_PH is the header we'll use to flash. Any external SPI programmer should do, but the next step assumes the use of a Raspberry Pi through its appropriate GPIO pins. The small pin pitch of the header can be challenging to clamp onto, so for convenience I also used a set of IC hook probes and the Adafruit SWD (2x5 1.27mm) Cable Breakout Board. Ignore its pin labels obviously.
Flashing the BMC through SPI
!! Please unplug your mainboard before continuing as we will power BMC_PH from the programmer !!
Recent editions of Raspberry Pi OS come with the required kernel modules and software included, but don't forget to enable the SPI interface through the raspi-config menu.
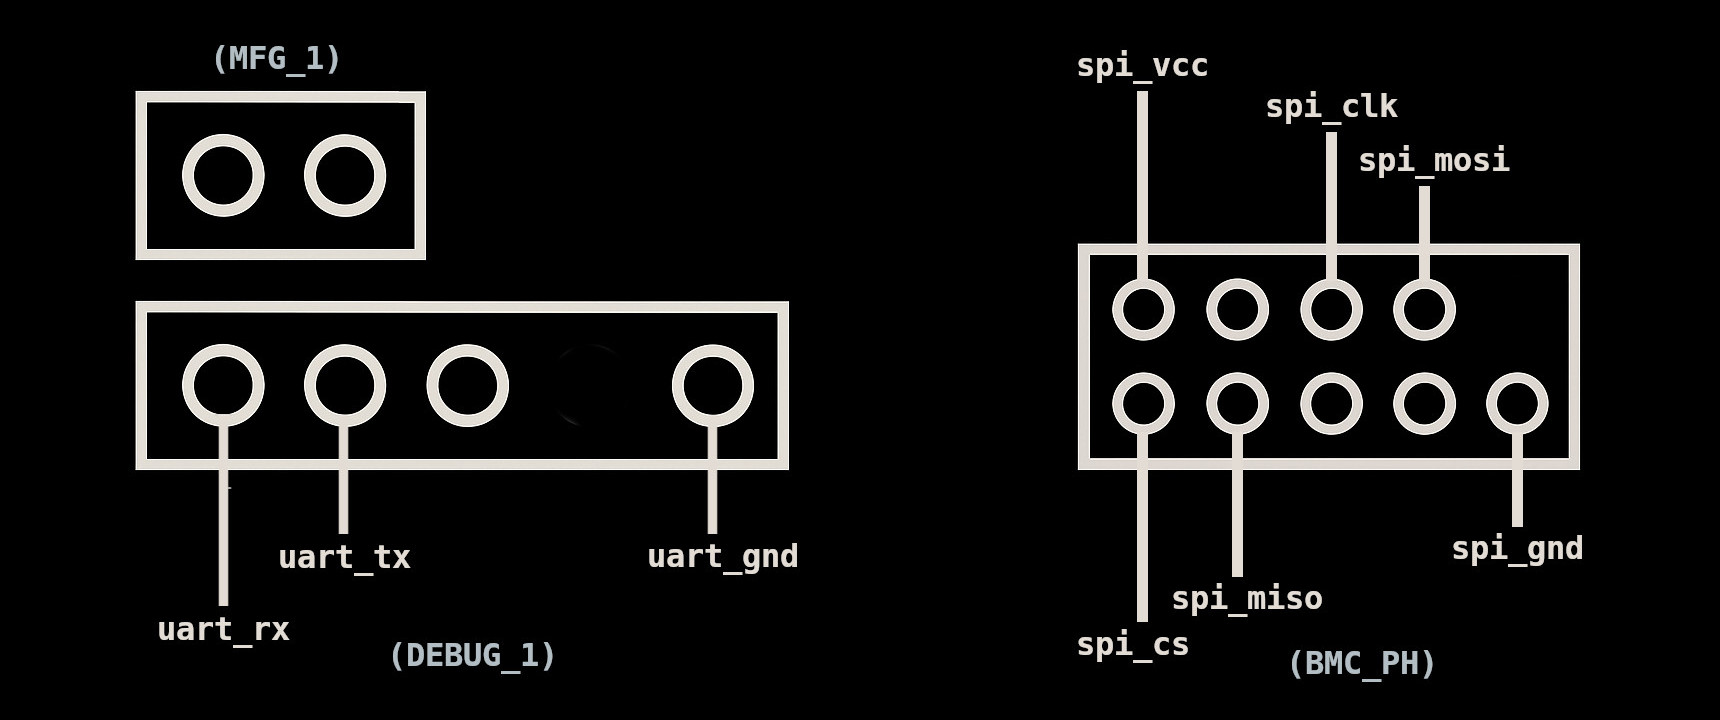
For a Raspberry Pi (2 and above) the following wiring scheme applies:
              GPIO
  spi_vcc  <-- 17
  spi_mosi <-- 19
  spi_miso <-- 21
  spi_clk  <-- 23 24 --> spi_cs
  spi_gnd  <-- 25
Now that our Pi is connected - we first back-up the original BMC firmware:
flashrom -p linux_spi:dev=/dev/spidev0.0,spispeed=1000 -c W25Q256JV_Q -r e3c246d4i-bmc-org-fw.rom
Assuming our OpenBMC build is finished, there should now be an 32M image file named obmc-phosphor-image-e3c246d4i-{timestamp}.static.mtd within filepath build/e3c246d4i/tmp/deploy/images/e3c246d4i relative to your source base directory. We write said image to the mainboard using:
flashrom -p linux_spi:dev=/dev/spidev0.0,spispeed=1000 -c W25Q256JV_Q -w {image-file}
A successful flash should resemble this output:
flash@gordon:~ $ sudo flashrom -p linux_spi:dev=/dev/spidev0.0,spispeed=1000 \
                               -c W25Q256JV_Q \
                               -w obmc-phosphor-image-e3c246d4i-20250715133701.static.mtd
flashrom unknown on Linux 6.12.34+rpt-rpi-2712 (aarch64)
flashrom is free software, get the source code at https://flashrom.org

Using clock_gettime for delay loops (clk_id: 1, resolution: 1ns).
Found Winbond flash chip "W25Q256JV_Q" (32768 kB, SPI) on linux_spi.
===
This flash part has status UNTESTED for operations: PROBE READ ERASE WRITE WP
The test status of this chip may have been updated in the latest development
version of flashrom. If you are running the latest development version,
please email a report to flashrom@flashrom.org if any of the above operations
work correctly for you with this flash chip. Please include the flashrom log
file for all operations you tested (see the man page for details), and mention
which mainboard or programmer you tested in the subject line.
Thanks for your help!
Reading old flash chip contents... done.
Erasing and writing flash chip... Erase/write done.
Verifying flash...

VERIFIED.
Nice one! Your AST2500 is now running OpenBMC. Disconnect your cable/probes from BMC_PH and restore power to your mainboard and it should start booting. You can either use UART through DEBUG_1 to verify or connect the dedicated BMC NIC and have it receive ipv4 from a DHCP server to allow access through SSH or the web-interface. The default credentials are root / 0penBmc.
Creating a Coreboot ROM image
Before building a Coreboot ROM image for our board, we will need to prepare a few blobs to include in our image. At the very minimum you will need the Intel Firmware Descriptor and the Management Engine (TODO). We take the easy path and extract ours from the latest stock BIOS available from ASRock:
#!/bin/bash

cd coreboot # source basedir

wget  "https://download.asrock.com/BIOS/Server/E3C246D4I-2T(2.50)ROM.zip"
unzip "E3C246D4I-2T(2.50)ROM.zip"

util/ifdtool/ifdtool -p cnl -x E6D4I2T2.50

BLOB_DIR="3rdparty/blobs/mainboard/asrock/e3c246d4i"

mkdir -p $BLOB_DIR
cp flashregion_0_flashdescriptor.bin $BLOB_DIR/descriptor.bin
cp flashregion_2_intel_me.bin        $BLOB_DIR/me.bin
By default, the descriptor.bin we include configures OCU1 (bottom) to PCIE mode and OCU2 (top) to SATA. Please refer to ocu-set-mode.sh to generate other mode configurations.
Now run make menuconfig and configure these mandatory values:
Mainboard ->
    Mainboard vendor -> Asrock
    Mainboard model -> E3C246D4I
Chipset ->
    [*] Add Intel descriptor.bin file
    [*] Add Intel ME/TXE firmware
Optionally, if your target board uses a processor with an integrated GPU, you may also be interested in adding a Video BIOS Table so your host system can properly initialize it:
Devices ->
    [*] Add a Video BIOS Table (VBT) binary to CBFS
You will need to dump the VBT from a running system or use the one I prepared:
#!/bin/bash

cd coreboot # source basedir

wget "https://vandermeij.tech/files/e3c246d4i-vbt.bin"
cp e3c246d4i-vbt.bin $BLOB_DIR/vbt.bin
The ROM image can now be compiled using make.
Flashing the BIOS from OpenBMC
Our OpenBMC install comes with a convenient script to flash the BIOS. Ensure that the host system is not running and transfer the Coreboot image we created just now to the BMC:
scp build/coreboot.rom root@{openbmc-ipv4}:/tmp/images/
This is where I ran into a minor bug. The script we are about to execute tries to bind the appropriate SPI controller, but mine appears to be already in a bound state, leading to errors and no flashing. I opened a bug report upstream but for now work around it by manually unbinding the controller first. Run the following two commands on the BMC shell:
echo 1e630000.spi > /sys/bus/platform/drivers/spi-aspeed-smc/unbind
bios-update.sh -d /tmp/images/
Your output should be:
bios-update: Checking BIOS image...
bios-update: Checking host state...
bios-update: Setting ME_OVERRIDE to 1...
bios-update: Setting FM_ME_RCVR_N to 0...
bios-update: Setting BMC_PCH_BIOS_CS_N to 0...
bios-update: Attaching BIOS flash...
[  650.790124] spi-nor spi1.0: w25q256 (32768 Kbytes)
[  650.801031] spi-aspeed-smc 1e630000.spi: No good frequency, using dumb slow
[  650.808232] spi-aspeed-smc 1e630000.spi: CE0 read buswidth:2 [0x203c0041]
bios-update: Writing BIOS image to SPI flash...
Erasing block: 512/512 (100%)
Writing kb: 32768/32768 (100%)
Verifying kb: 32768/32768 (100%)
bios-update: Flash update successful
bios-update: Detaching BIOS flash...
[  817.409613] Deleting MTD partitions on "bios":
bios-update: Resetting BMC_PCH_BIOS_CS_N to 1...
bios-update: Resetting FM_ME_RCVR_N to 1...
bios-update: Resetting ME_OVERRIDE to 0...
bios-update: BIOS update complete.
bios-update: Holding host power line for 8 seconds...
bios-update: Host power line released...
bios-update: Done.
Your BIOS flash chip is now running Coreboot.
Conclusion
Feels great to run with an open-source firmware stack. Stay tuned for more updates.